Owl Bowl: A Practical Guide to Printing and Using This Decorative 3D Model
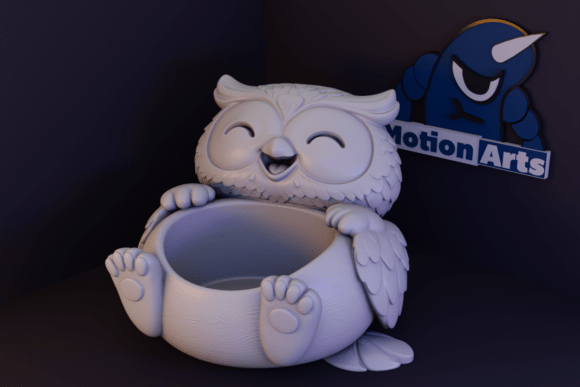
The intersection of functionality and whimsy is where many successful 3D printing projects live. The Owl Bowl sits squarely in this category, offering a charming solution for desk organization, small plant housing, or simply as a decorative accent. At first glance, it appears to be a simple download-and-print task. However, treating any 3D model as purely plug-and-play often leads to disappointing results, wasted filament, and structural failures. Understanding the nuances of this specific design—a cute, cartoon-style owl holding an integrated bowl—requires a shift from passive downloading to active evaluation.
For beginners and experienced makers alike, the appeal of the Owl Bowl is obvious. Its rounded, well-balanced shapes suggest stability, and the character design adds personality to otherwise utilitarian spaces. Yet, the very features that make it aesthetically pleasing can trip up users who overlook technical requirements. This guide explores common pitfalls associated with printing and utilizing this model, offering corrective advice to ensure your final product is both durable and visually appealing.
Misunderstanding Support Requirements
One of the most frequent errors users make with the Owl Bowl is assuming that "beginner-friendly" equates to "support-free." While the design features smooth curves and balanced geometry, the description explicitly states that supports are required. Ignoring this instruction is a primary cause of print failure.
The owl’s wings, the curvature of the head, and the integration point where the bowl meets the body often create overhangs that exceed the typical 45-degree rule for FDM printing. Without proper support structures, these areas will sag, resulting in a distorted shape or a bowl that cannot hold items securely. Some users attempt to print without supports to save time on post-processing, only to find the final piece unusable.
The Better Approach: Embrace the need for supports. Use your slicer’s automatic support generation, but take the time to manually adjust support density and placement if possible. Tree supports are often an excellent choice for organic shapes like this owl, as they provide necessary stabilization while minimizing contact points, making removal easier and leaving fewer marks on the visible surfaces.
Overlooking Wall Thickness and Infill
Another common oversight involves slicer settings related to structural integrity. Because the Owl Bowl is designed to hold items—whether keys, coins, or soil for a small succulent—it must withstand weight and potential moisture. Many beginners default to standard settings: two perimeter walls and 15% infill. For a decorative statue, this might suffice. For a functional bowl, it is often inadequate.
Thin walls can crack under the pressure of expanding soil or when dropping small metal objects into the bowl. Furthermore, low infill can lead to a hollow sound and a feeling of cheapness, detracting from the premium look of the design. If you intend to use this as a planter, water retention becomes a critical issue. Standard PLA is not waterproof, and low-density prints can wick moisture, leading to degradation over time.
Practical Advice: Increase your wall count to at least three or four perimeters. This adds significant strength without drastically increasing print time. For infill, consider raising it to 20–25% if you plan to store heavier items. If using the bowl for plants, always use a plastic liner or insert. Never rely on the printed material itself to hold water directly, as layer lines will eventually leak.
Ignoring Scale and Proportion
Dimensions matter more than many realize. The Owl Bowl is designed with specific proportions to ensure stability. A common mistake is scaling the model up or down significantly without recalculating print parameters. Scaling down too much can result in nozzle clogs or details that fail to resolve, particularly in the owl’s facial features. Scaling up excessively can expose layer adhesion weaknesses, causing the bowl to split under its own weight or the weight of its contents.
Additionally, users often fail to measure their intended space. A bowl that looks perfect on screen may be too large for a crowded desk or too small to be useful for anything other than paperclips. This mismatch leads to clutter rather than organization.
Check Before Printing: Verify the real-world dimensions provided in the model files. Use a ruler to visualize the size on your desk. If you need a different size, adjust in small increments (e.g., 5–10%) and test print a small section if possible. Ensure the base remains wide enough to prevent tipping, especially if the bowl is loaded asymmetrically.
Material Selection Mistakes
While PLA is the go-to material for beginners due to its ease of use, it is not always the best choice for every application of the Owl Bowl. PLA has a low glass transition temperature. Leaving a printed owl in a hot car or near a sunny window can cause it to warp or deform. This is particularly problematic if the bowl is used to hold items that might generate heat or if it is placed in a direct sunlight spot for decorative purposes.
Conversely, some users jump straight to PETG or ABS without adjusting their printer settings, leading to poor layer adhesion or warping. PETG is a superior choice for functional parts due to its durability and slight flexibility, but it requires different cooling and temperature settings than PLA.
Recommendation: Stick to high-quality PLA for purely decorative uses or light desk organization. If you plan to use the bowl in a warmer environment or need greater durability, switch to PETG. Ensure your printer is tuned for the specific material, paying close attention to bed temperature and cooling fan speeds to maintain the crisp details of the cartoon style.
Post-Processing and Finish Quality
The final aesthetic of the Owl Bowl depends heavily on post-processing. A frequent error is rushing the support removal process. Aggressive cutting or pulling can leave unsightly scars on the owl’s face or the rim of the bowl. These marks are difficult to sand down without altering the intended shape.
Moreover, many users skip the cleaning phase entirely. Leftover support fragments and stringing can make the model look amateurish. For a design meant to be cute and polished, surface quality is paramount.
Better Practices: Use flush cutters to remove supports close to the model, then carefully trim the remaining nubs with a sharp hobby knife. Light sanding with fine-grit sandpaper (400–600 grit) can smooth out imperfections. If you plan to paint the owl, apply a primer filler first to hide layer lines and create a uniform surface. This extra step transforms a standard print into a professional-looking decorative piece.
Evaluating Usability for Your Needs
Before committing to a print run, consider the actual utility. The Owl Bowl is versatile, but it is not a universal solution. It is ideal for small, lightweight items. It is not suitable for heavy tools, liquids, or food storage. Misjudging its capacity can lead to breakage or dissatisfaction.
Ask yourself: What will this hold? If the answer is "keys," ensure the bowl is deep enough to prevent them from sliding out. If the answer is "a succulent," ensure the diameter matches standard nursery pots. If the answer is "nothing, just decoration," focus on color and finish.
By aligning your expectations with the design’s limitations, you avoid the frustration of a failed project. The Owl Bowl is a delightful addition to any 3D printing portfolio, provided it is approached with attention to detail, proper slicing strategies, and realistic usage goals. Take the time to prepare, print, and finish correctly, and you will end up with a stable, charming, and functional piece that stands the test of time.