Elegant Floral Tissue Box SVG Design
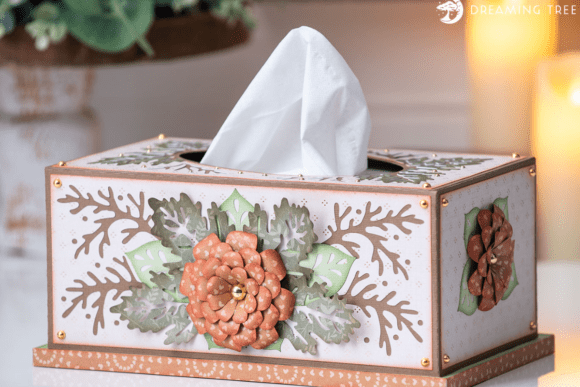
Transforming a mundane household item into a piece of decor is one of the most satisfying aspects of paper crafting. The Floral Tissue Box SVG offers a perfect entry point for this kind of creative upgrade. Instead of hiding an unsightly cardboard box in a cabinet or covering it with a generic fabric sleeve, you can craft a custom cover that complements your interior design. This digital cut file allows you to create a layered, three-dimensional floral accent that sits beautifully on nightstands, bathroom vanities, or office desks.
For those new to digital cutting, the concept is straightforward. You download the file, load it into your software, and send it to your machine. The result is a set of precision-cut pieces that assemble into a decorative shell. The appeal lies in the customization. You are not limited to store-bought colors or patterns. By selecting specific cardstocks, you control the final aesthetic, ensuring it matches your seasonal decor or personal style perfectly.
Why Choose a Layered Paper Design?
The primary advantage of using a layered SVG design is depth. Flat paper crafts can sometimes look two-dimensional and simple, but layering adds shadow and texture. The Floral Tissue Box SVG is crafted with this principle in mind. It uses multiple sheets of cardstock to build up floral elements that appear to bloom from the surface of the box. This technique elevates the project from a simple school craft to a sophisticated home accessory.
Beyond aesthetics, there is the factor of durability. When constructed with quality materials, such as 80 lb cover weight cardstock, the resulting box cover is sturdy. It protects the tissue box inside while maintaining its shape over time. Unlike fabric covers that may slip or slide, a well-fitted paper structure stays in place, providing a neat and tidy appearance. This makes it an excellent choice for high-traffic areas where both function and form matter.
Understanding the Materials and Tools
Success in paper crafting often depends on material selection. For this specific project, the design is optimized for standard 12x12 inch cutting mats, which are common in most hobbyist machines. The supply list suggests using a variety of textures and colors to achieve the intended look. For instance, using Truffle cardstock provides a neutral, earthy base that allows brighter floral colors to pop. Mint cardstock adds a fresh, modern touch, while patterned papers from stacks like the DCWV English Garden collection introduce visual interest without overwhelming the design.
It is important to note the weight of the paper. The recommended Encore Cardstock at 216 gsm is thick enough to hold its shape but thin enough to cut cleanly. Using paper that is too thin may result in a flimsy structure, while paper that is too thick might be difficult to fold or adhere properly. Additionally, having the right adhesives is crucial. Foam squares are typically used to create spacing between layers, enhancing the 3D effect, while strong liquid glue ensures the structural integrity of the box.
Compatibility and File Formats
One of the most common questions for beginners is whether their machine can handle the file. The Floral Tissue Box SVG is delivered in SVG format, which is the industry standard for vector graphics. This means it is compatible with almost all major cutting machines and software platforms. Whether you use Cricut Design Space, Silhouette Studio, or other third-party applications, you should be able to import and manipulate the file with ease.
Along with the SVG file, a PDF legend is usually included. This document serves as a visual guide, helping you identify which piece corresponds to which part of the final assembly. For complex layered designs, this legend is invaluable. It prevents confusion during the cutting process and helps you organize your pieces before you begin gluing. Some creators also provide video tutorials, which can be particularly helpful for visual learners who want to see the assembly process in real-time.
Practical Applications and Use Cases
While the primary use is obviously for tissue boxes, the versatility of this design extends further. Here are a few ways you might utilize this project:
- Home Decor: Create a cohesive look in your bathroom by matching the box cover to your towels or shower curtain.
- Gift Giving: A handmade tissue box cover makes a thoughtful housewarming gift. Pair it with a box of premium tissues for a complete present.
- Seasonal Updates: By changing the paper colors, you can adapt the design for different seasons. Use pastels for spring, brights for summer, warm tones for autumn, and cool whites or silvers for winter.
- Small Business Products: If you sell handmade goods, these boxes can be added to your inventory. They are relatively quick to produce once you have the workflow down, offering a good margin for craft fairs or online shops.
For educators, this project can serve as an advanced lesson in geometry and spatial reasoning. Students learn how 2D shapes transform into 3D objects, practicing fine motor skills through assembly. It encourages patience and attention to detail, valuable traits in any learning environment.
Important Considerations Before Starting
Before you begin cutting, there are a few practical details to keep in mind. First, check the dimensions of your tissue box. The design is tailored for rectangular boxes no taller than 3.75 inches. If your box is larger, the cover may not fit correctly. You can resize the SVG in your software, but be aware that this may affect the proportion of the floral elements and the amount of material needed.
Second, consider the complexity of the layering. While the design is user-friendly, it does involve multiple small pieces. Setting up an organized workspace is essential. Use sorting trays or labeled envelopes to keep pieces separated by color and layer. This preparation saves time and reduces frustration during assembly.
Finally, think about the placement of the finished product. Areas with high humidity, such as a bathroom without proper ventilation, may cause paper to warp over time. Applying a clear sealant spray can help protect the paper from moisture and extend the life of your creation.
Getting Started with Your Project
Starting your first Floral Tissue Box SVG project is easier than it looks. Begin by gathering your supplies: four sheets of Truffle cardstock, two sheets of Mint, and your chosen patterned papers. Load your mat and send the files to your cutter. Take your time during the weeding process, removing excess paper carefully to avoid tearing delicate floral details.
Assembly is where the magic happens. Follow the PDF legend or video tutorial step-by-step. Start with the base structure, then add the layers of flowers and leaves. Use foam squares strategically to create depth, but ensure they are hidden beneath the top layers for a clean finish. Add final touches like faux pearls or ink edging to enhance the vintage or elegant feel of the piece.
By following these guidelines, you will create a functional and beautiful item that enhances your living space. The satisfaction of turning digital files into tangible decor is unmatched, and this floral design is a wonderful way to experience that joy. Whether you are a seasoned crafter or a curious beginner, this project offers a rewarding blend of creativity and practicality.